Developer Guide
Table of Contents
- Introduction
- Setting Up, Getting Started
2.1 Setting up the project in your local machine
2.2 Before writing the code - Design
3.1 Architecture
3.2 UI component
3.3 Parser component
3.4 Model component
3.5 Storage component - Implementation
4.1 Store Data
4.2 Add Module
4.3 Add Time
4.4 Minus Time
4.5 Edit Time
4.6 View modules
4.7 Breakdown and analysis
4.8 Add Task
4.9 Mark Task as Done - Documentation, logging, testing, dev-ops
- Appendix: Requirements
6.1 Product Scope
6.2 User Stories
6.3 Use Cases
6.4 Non-Functional Requirements
6.5 Glossary - Appendix: Instructions for Manual Testing
1. Introduction
ModTracker is a desktop app for NUS students to track the time spent as well as tasks to do for each of their modules. It helps students prioritise their work and balance their time spent amongst their modules. This app uses a Command Line Interface (CLI) and is written in Java 11.
2. Setting Up, Getting Started
2.1 Setting up the project in your local machine
Ensure that you have JDK 11 or above installed on your computer.
First, fork this repo, and clone a copy to your computer by using any Git client.
If you plan to use IntelliJ IDEA (highly recommended):
- Ensure IntelliJ is configured to use JDK 11.
- Start up IntelliJ into the welcome page.
- Click on
Configure->Structure for New Projects->Project Settings->Project. - Under the
Project SDK:section, ensure that the correct SDK (java version "11.0.8" or higher) is selected.
- Import the project as a Gradle project.
- At the same welcome page, click on
Open or Import. - Navigate to the folder where you cloned the repo, locate the
build.gradlefile within the folder and select it. - Choose the
Open as Projectoption when asked. - The project may take a couple of minutes to import depending on your actual computer hardware setup.
- At the same welcome page, click on
- Verify the setup.
- Under the
seedu.modtrackerpackage, locate theModTrackerclass and run it. - Try a few commands. You may want to refer to the user guide.
- Run the tests to ensure they all pass.
- Under the
2.2 Before writing the code
-
Configure the coding style
- If using IntelliJ IDEA, follow this guide to set up IDEA's coding style to match ours.
-
Set up CI
- This project comes with a GitHub Actions config files (in
.github/workflowsfolder). When GitHub detects those files, it will run the CI for the project automatically at each push to themasterbranch or to any PR. No setup is required for this.
- This project comes with a GitHub Actions config files (in
-
Learn the design
- When you are ready to start coding, we recommend that you look at ModTracker's architecture to get some sense of the overall design.
3. Design
3.1 Architecture
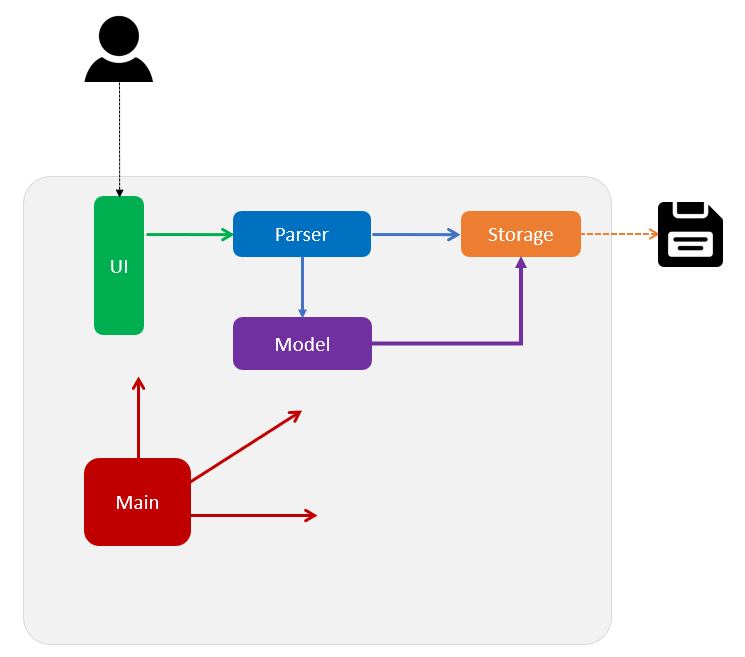
Figure 1. Architecture Diagram
The Architecture Diagram given above explains the high-level design of the App. Given below is a quick overview of each component.
The Main component is the main entry point for the ModTracker application. It contains the main, loadData, run,
startAndGetName and runCommandLoopUntilExitCommand methods. The methods are responsible for:
- At app launch:
- Creation of a ModTracker object.
- Load previously saved data from the text file into ModTracker.
- Run the ModTracker app.
- At runtime:
- Continuously prompt the user for input until app termination.
- At shut down:
- Save user data into a text file.
- Invoke clean up methods where necessary.
The rest of the app consists of 4 components:
Ui: The user interface of the app.Parser: Parses the user input and calls the corresponding methods.Model: Holds the data of the app in-memory, containing the classes: ModuleList, Module, TaskList and Task.Storage: Saves and loads data to and from the hard disk.
How the architecture components interact with each other
The Sequence Diagram below shows how the components interact with each other for the scenario where the user types
the command addmod CS2113T.
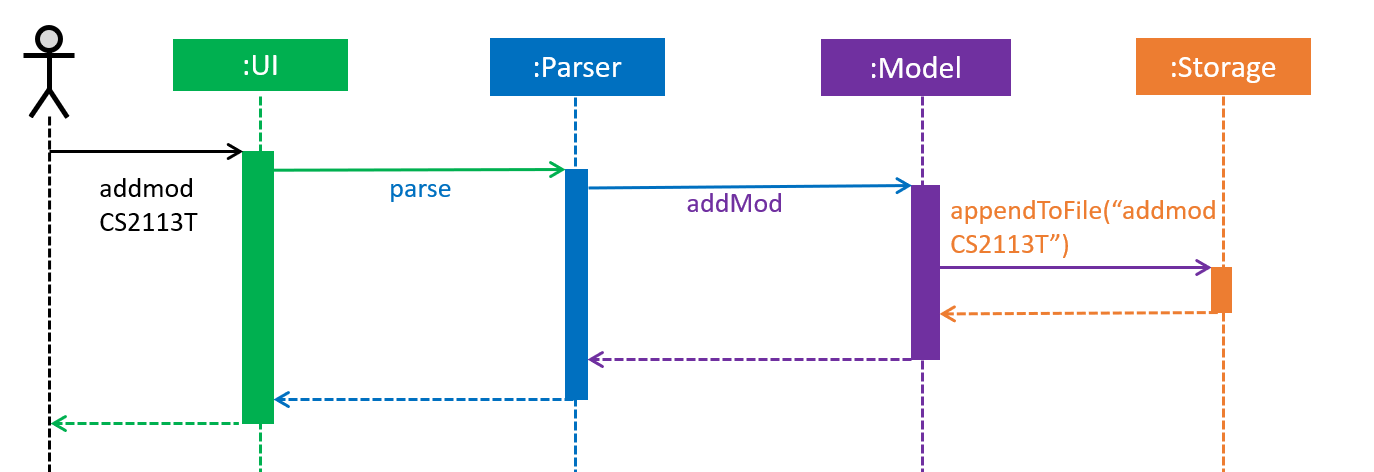
Figure 2. Component interactions for addmod CS2113T command
3.2 UI component
UI consists of a UI class that is responsible for dealing with user interaction.
The UI component,
- Reads in the user input and passes the user input to the
Parsercomponent. - Displays the message to the user based on the commands inputted by the user.
3.3 Parser component
The Parser component,
- Determines whether the user input is valid.
- Identifies the command to be executed.
- Passes the required information and calls the respective function to execute the command.
3.4 Model component
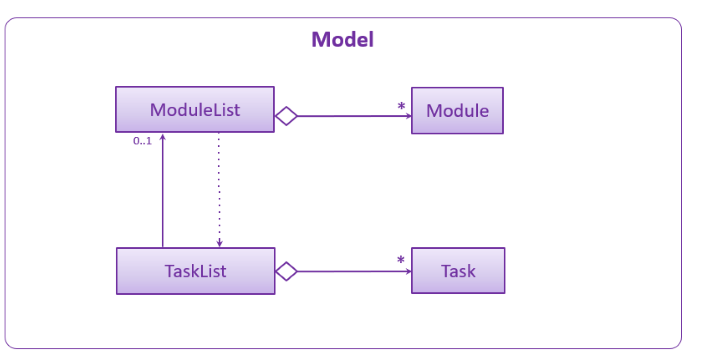
Figure 3. Structure of the Model Component
The Model,
- Consists of ModuleList class that supports functions to execute module-related commands, such as addmod, deletemod etc.
- Consists of Module class that represents the module.
- Consists of TaskList class that supports functions to execute task-related commands, such as addtask, deletetask etc.
- Consists of Task class that represents the task.
3.5 Storage component
The Storage component,
- Loads data from an external file at the start of the program.
- Saves valid data to the file after any changes.
- Locks the file to read-only mode before the program ends.
4. Implementation
This section describes some noteworthy details on how certain features are being implemented.
4.1 Store Data
The storage feature saves the data of the user so that the ModTracker application continues from where the user left off the previous time.
Current Implementation
The Storage class facilitates the data saving and loading mechanism.
The constructor Storage(filePath) accepts a String which is the file path to an external file.
This external file stores the user's data locally.
Inside the external file, it stores the name of the user followed by any valid inputs which modifies the data. The format of the data inside the external file is as follows:
username
valid user input 1
valid user input 2
valid user input 3
...
When the user runs the program again,
the program will first load data from the external file.
The Parser class then parses these data
before the program prompts the user for input.
Given below is an example usage scenario, showing the 2 different times when a user starts the application.
First Use
The user launches the application for the first time.
-
ModTrackercreates a newStorageobject with file path atdata/modtracker.txt. -
The newly created
Storageobject checks that there is no file at the specified file path, and creates a new file there. -
The program prompts the user to input his/ her name.
-
The
Storageobject writes this username into the external file. -
The program prompts the user for further inputs.
-
The user enters
help, and the program displays the help message. Since this command does not modify the data, the external file remains unchanged. -
The user enters
addmod CS1010 10, and the program adds the new module correspondingly. Since this is a valid command which modifies the data, theStorageobject appendsaddmod CS1010 10to the external file. -
The user enters
exit, and the program terminates.
Subsequent Use
The same user starts the application again (on the same device as the first use).
-
ModTrackercreates a newStorageobject with the same specified file path atdata/modtracker.txt. -
The
Storageobject checks that the file atdata/modtracker.txtexists, and reads the first line of the file to obtain the user's name. -
The
Storageobject passes the username toModTracker, which callsUito greet the user. -
ModTrackerthen obtains the remaining lines in the file viaStorage, and passes it toParserto load the data intoModuleListandTaskList. -
The program prompts the user for further inputs, and it continues as per normal, with the data loaded.
The following sequence diagram shows how the storage feature works, with a focus on how it obtains the username:

Figure 4. Sequence Diagram of Storage feature
Design Considerations
- Alternative 1 (current choice): Saves the user input to the file
- Pros: Easy to implement as code from
Parsercan be reused - Cons: Increases coupling as it depends on the
Parserclass to make sense of the data
- Pros: Easy to implement as code from
- Alternative 2: Parses input into a different format
storing the different modules, time expected, time spent and tasks
- Pros: Independent of how
Parsertakes in user input - Cons: Requires additional work to parse data into the required storage format
- Pros: Independent of how
4.2 Add Module
Current Implementation
The add module feature will implement the checks of the module code input by the user through the following operations:
checkIfModuleValid() – Checks if the module code starts with 2 - 3 characters, followed by 4 digits, followed by an
optional character.
checkIfModuleExist() – Checks if the module already exists in the list of modules
If the module code is valid and does not exist, the add module feature will proceed to create the module and adds it to the list of modules.
NOTE: A module is identfied by its module code
The following activity diagram summarizes what happens when a user executes addmod CS2113T command for the first time.
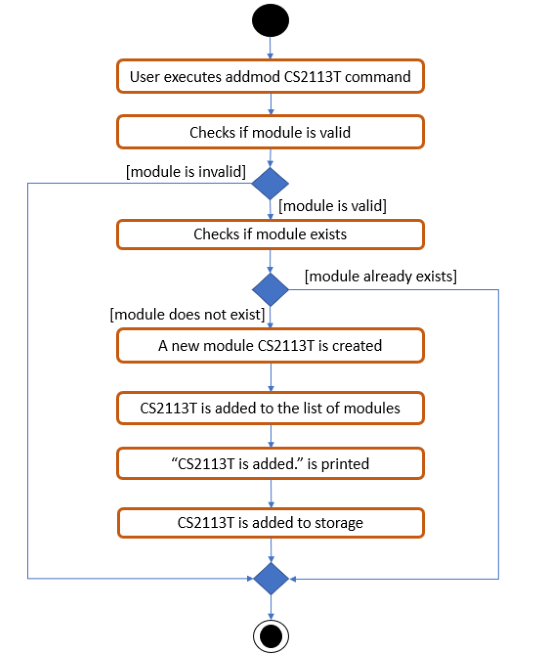
Figure 5. Activity Diagram of Add Module feature
Given below is a detailed explanation on how the add module mechanism behaves at each step.
-
The user launches the application for the first time and hence, the list of modules is empty. The user types in a command:
addmod CS2113T. -
The parser class makes sense of the user input and calls the
addMod()function in ModuleList class. -
Within the
addMod()function, it will first check if the module code is valid by callingcheckIfModuleValid()function. ThecheckIfModuleValid()function will return true if the module code is valid, and return false otherwise. IfcheckIfModuleValid()function returns true, proceed to step 4. -
Within the addmod function, it will then check if the module already exists in the list of modules by calling
checkIfModuleExist()function. ThecheckIfModuleExist()function will return true if the module already exists in the modlist, and false otherwise. IfcheckIfModuleValid()function returns true, proceed to step 5. -
A new module with module code "CS2113T” is created by calling the constructor of Module class.
-
The newly created module is added to the list of modules.
-
The
printAdd()function of the Ui class is called, displaying “CS2113T is added.” to the user. -
The newly created module is saved to storage.
The following sequence diagram shows how the addmod CS2113T command works.
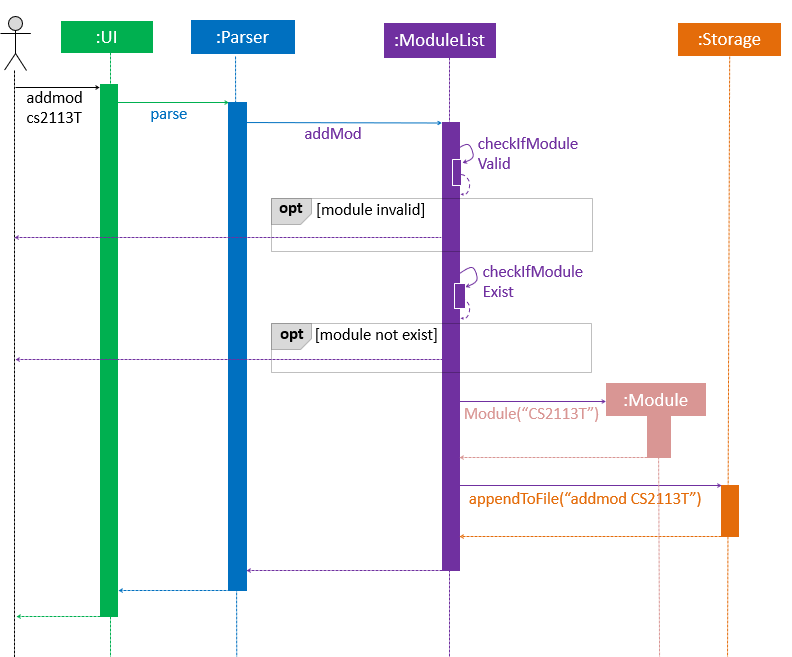
Figure 6. Sequence Diagram of Add Module feature
Design Considerations
Aspect: Checking existence of module by checkIfModuleExist() within addmod() function
-
Alternative 1 (Current choice): Checks that module does not exist in the list of modules before adding a new module
- Pros: Ensure that there will be no duplicate modules in the list of modules
- Cons: User cannot have 2 same modules in the list of modules.
-
Alternative 2: Always add a new module
- Pros: The user can have 2 same modules in the list of modules.
- Cons: If the user had inputted 2 same modules and wants to add the workload for these modules, the current application will only update the module that was inputted earlier, ignoring the second module, resulting in inconsistency.
- Cons: If the user does not want duplicate modules, the user must ensure he/she does not add a module that is already in the list of modules.
4.3 Add Time
The add time feature edits the actual workload for a specific module as indicated by the user. This is done by adding time spent on the module. The actual workload is broken down into academic weeks and hours spent in the respective academic weeks.
Current Implementation
The feature will implement the same checks as the add module feature as shown earlier.
The feature will also implement two additional checks namely:
checkIfTimeValid - checks if the time input is valid. For instance, the time input cannot have alphabets
neither can it be too large.
checkIfWeekValid - checks if the week input is valid. For instance, the week input cannot be more than two
digits or contain alphabets.
doesTimeExceed99 - checks if the time the user wishes to add will cause the total time to exceed 99 hours.
If the module code is valid and exists the add time feature will proceed to add time from the module as indicated by the user.
Given below is an example usage scenario and how the add time command behaves at each step.
NOTE: The first number is the hours spent in that week. The second number is the academic week that is being updated.
-
The user launches the application and does all required steps to add a module with module code
CS2113Tto a list of modules. This is done by inputting the commandaddmod CS2113T. -
The user now types in a command:
addtime CS2113T 2 4. This calls the addtime command fromParser.Parserthen calls theaddTime()method inModuleListand passesCS2113T,2and4as parameters into the method. -
Within the
addTime()function, it will first check if the module code is valid by callingcheckIfModuleValid()function. If the module code is valid, thecheckIfModuleValid()function will return true. -
Within the
addTime()function, it will check if the module exists in the module list storage by callingcheckIfModuleExist()function. If the module does exist, thecheckIfModuleExist()function will return true. -
Within the
addTime()function, it will check if the time input is valid by callingcheckIfTimeValid()function. If the time input is valid, thecheckIfTimeValid()function will return true. -
Within the
addTime()function, it will check if the week input is valid by callingcheckIfWeekValid()function. If the week input is valid, thecheckIfWeekValid()function will return true. -
Within the
addTime()function, it will check if the hours the user wishes to add will cause the total time to exceed 99 hours by calling thedoesTimeExceed99()function. If the time does exceed 99, thedoesTimeExceed99()function will return true. -
A time of
2hours in academic week4is added to the actual workload of theCS2113Tmodule. -
The system will print the output string
2 hours have been added to CS2113T -
The actual workload gets updated in storage.
The following sequence diagram illustrates what happens when a user executes addTime CS2113T 2 4.
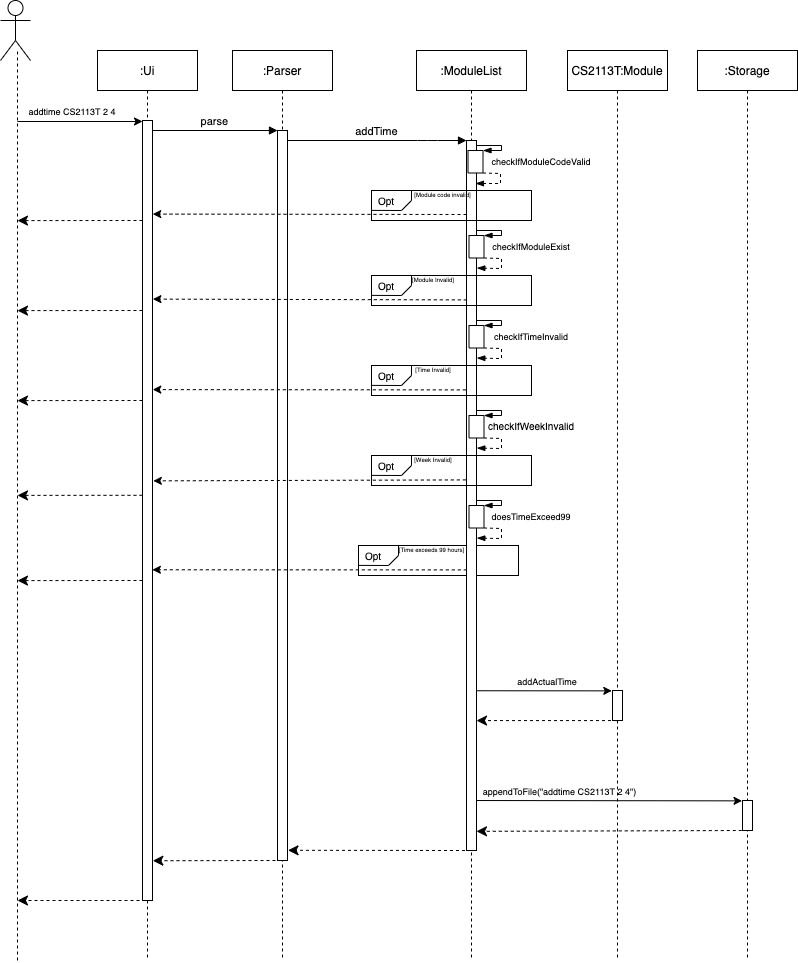
Figure 7. Sequence Diagram of Add Time feature
Design Considerations
- Alternative 1 (current choice): adding time with academic weeks associated in input
- Pros: Easier to manage for user as user only needs to focus on the current academic week to track his workload
- Cons: The user might prefer to manage his time spent in totality
- Alternative 2: adding time in totality (without indication of weeks)
- Pros: Able to cumulatively add time and manage workload based on the overall total time spent.
- Cons: May not be very useful to know total time spent as workload may be better managed weekly.
4.4 Minus Time
The minus time feature edits the actual workload for a specific module as indicated by the user. This is done by removing time spent on the module. The actual workload is broken down into academic weeks and hours spent in the respective academic weeks. This feature is the opposite of the add time feature.
Current Implementation
The feature will implement the same checks as the add time feature as shown earlier in section 4.3.
As the command now is minus time, there would be two additional checks implemented.
doesActualTimeExist() - checks if the module code has existing actual workload stored to it.
doesHoursExceedTotal() - checks if the hours the user wishes to remove exceed the total hours in the actual workload.
If the module code is valid, exists and has an actual workload the minus time feature will proceed to minus time from the module as indicated by the user.
Given below is an example usage scenario and how the minus time command behaves at each step.
NOTE: The first number is the hours spent in that week. The second number is the academic week that is being updated.
-
The user launches the application and does all the required steps to add a module with module code
CS2113Tto a list of modules. This is done by input of the commandaddmod CS2113T. -
The user then does all the required steps to add
2hours of time spent in academic week4onCS2113T. This is done by input of the commandaddtime CS2113T 2 4. -
The user now types in a command:
minustime CS2113T 2 4. This calls the minustime command fromParser.Parserthen calls theminusTime()method inModuleListand passesCS2113T,2and4as parameters into the method. -
Within the
minusTime()function, it will first check if the module code is valid by callingcheckIfModuleValid()function. If the module code is valid,checkIfModuleValid()function will return true. -
Within the
minusTime()function, it will check if the module exists in the module list storage by callingcheckIfModuleExist()function. If the module does exist, thecheckIfModuleExist()function will return true. -
Within the
minusTime()function, it will also check if the time input is valid by callingcheckIfTimeValid()function. If the time input is valid, thecheckIfTimeValid()function will return true. -
Within the
minusTime()function, it will subsequently check if the week input is valid by callingcheckIfWeekValid()function. If the week input is valid, thecheckIfWeekValid()function will return true. -
Within the
minusTime()function, it will then check if there is an existing actual workload for this module by calling thedoesActualTimeExist()function. If the module has an existing workload, thedoesActualTimeExist()function will return true. -
Within the
minusTime()function, it will lastly check if the hours the user wish to remove is more than the existing hours by calling thedoesHoursExceedTotal()function. If the module has an existing workload, thedoesHoursExceedTotal()function will return true. -
A time of
2hours in academic week4will be removed from the actual workload of theCS2113Tmodule. -
The system will print the output string
2 hours have been removed from CS2113T -
The actual workload gets updated in storage.
The following sequence diagram illustrates what happens when a user executes minusTime CS2113T 2 4.
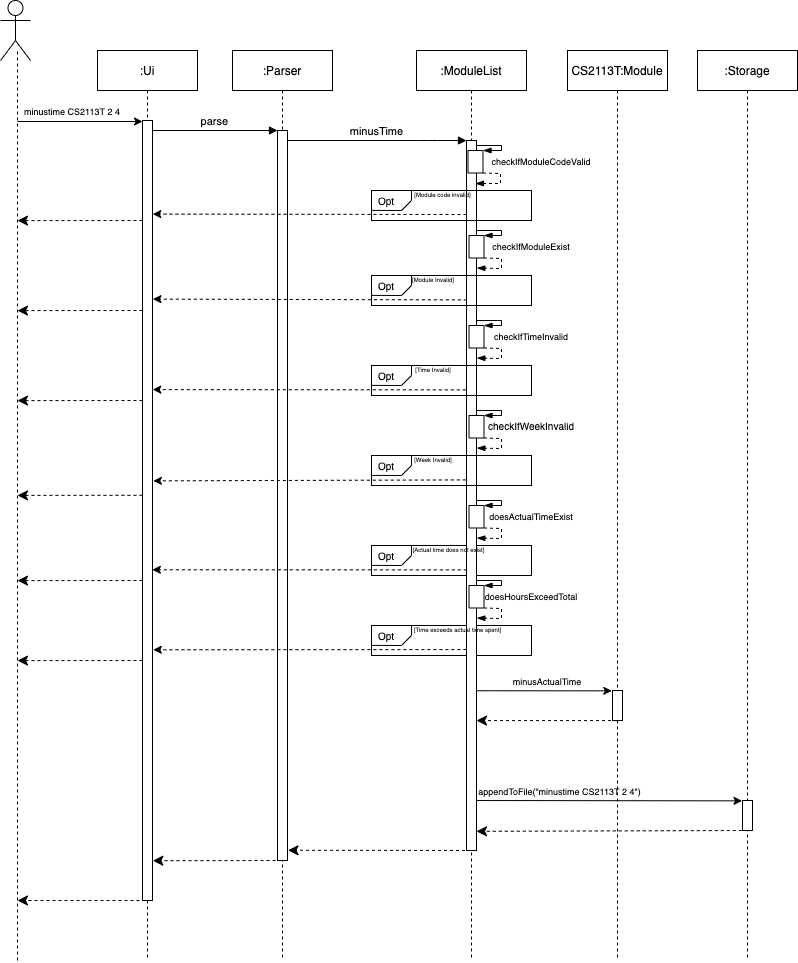
Figure 8. Sequence Diagram of Minus Time feature
Design Considerations
- Alternative 1 (current choice): removing time with academic weeks associated in input
- Pros: Easier to manage for user as the user only needs to focus on the current academic week to track workload
- Cons: User might prefer to manage time spent in totality
- Alternative 2: minus time in totality (without indication of weeks)
- Pros: Able to cumulatively remove time and manage workload based on overall total time spent in all weeks.
- Cons: May not be very useful to know total time spent as workload may be better managed weekly.
4.5 Edit Time
The edit time feature edits the actual workload for a specific module as indicated by the user. This is done by replacing the time spent on the module. The actual workload is broken down into academic weeks and hours spent in the respective academic weeks.
Current Implementation
The feature will implement the same checks as the add time module feature as shown earlier in section 4.3.
If the module code is valid and exists the edit time feature will proceed to edit the time from the module as indicated by the user.
Given below is an example usage scenario and how the edit time command behaves at each step.
NOTE: The first number is the hours spent in that week. The second number is the academic week that is being updated.
-
The user launches the application and does all the required steps to add a module with module code
CS2113Tto a list of modules. This is done by input of the commandaddmod CS2113T. -
The user now types in a command:
edittime CS2113T 2 4. This calls the edittime command fromParser.Parserthen calls theeditTime()method inModuleListand passesCS2113T,2and4as parameters into the method. -
Within the
editTime()function, it will first check if the module code is valid by callingcheckIfModuleValid()function. If the module code is valid,checkIfModuleValid()function will return true. -
Within the
editTime()function, it will subsequently check if the module exists in the module list storage by callingcheckIfModuleExist()function. If the module does exist, thecheckIfModuleExist()function will return true. -
Within the
editTime()function, it will next check if the time input is valid by callingcheckIfTimeValid()function. If the time input is valid, thecheckIfTimeValid()function will return true. -
Within the
editTime()function, it will lastly check if the week input is valid by callingcheckIfWeekValid()function. If the week input is valid, thecheckIfWeekValid()function will return true. -
A time of
2hours in academic week4will be the new actual workload of theCS2113Tmodule. -
The system will print the output string
2 hours have been added to CS2113T2 hours have been spent on this module in week 4 -
The actual workload gets updated in storage.
Design Considerations
- Alternative 1 (current choice): time input rounded off to 1 decimal place.
- Pros: Easy to store and easier for user to view. Also provides consistency throughout the app.
- Cons: User might prefer to manage his time spent more precisely with high number of decimal places
- Alternative 2: time input left unedited.
- Pros: App takes in exactly what user inputted.
- Cons: May not be easy to view the time when the actual time spent has too many decimal places.
4.6 View modules
Current Implementation
The view module command allows the user to view all the modules taken,
the respective time spent and expected module workload at a glance. It prints
weekNumber,moduleCode, expectedWorkload and actualWorkload in the specified
week for all the modules taken in a table format.
Given below is an example usage scenario and how the view module command behaves at each step.
-
User calls the view module command from the
Parser.Parserthen calls theprintTable()method inUi.printTable()then instantiatesModViewclass and calls theprintAllModuleInformation()method from theModViewclass. -
User input is subjected to
validateInputs()to verify that both of the following conditions are satisfied.
weekNumberis an integer between 1 and 13 inclusive.modlistinlistis not empty.
If any of the above conditions is not satisfied, an error message will be printed
and printAllModuleInformation() terminates.
-
A method
getMaxModuleLength()will be called to find out the maximum length of module code of modules taken. This is to facilitate the resizing of the printed table. -
updateTemplates()then updates the table templates such asborder,headerandcontentsare updated accordingly based on the output ofgetMaxModuleLength(). -
For each
ModuleinmodList,updateContent()will be called to update the contents to be printed.
The following sequence diagram shows how the view module command works.
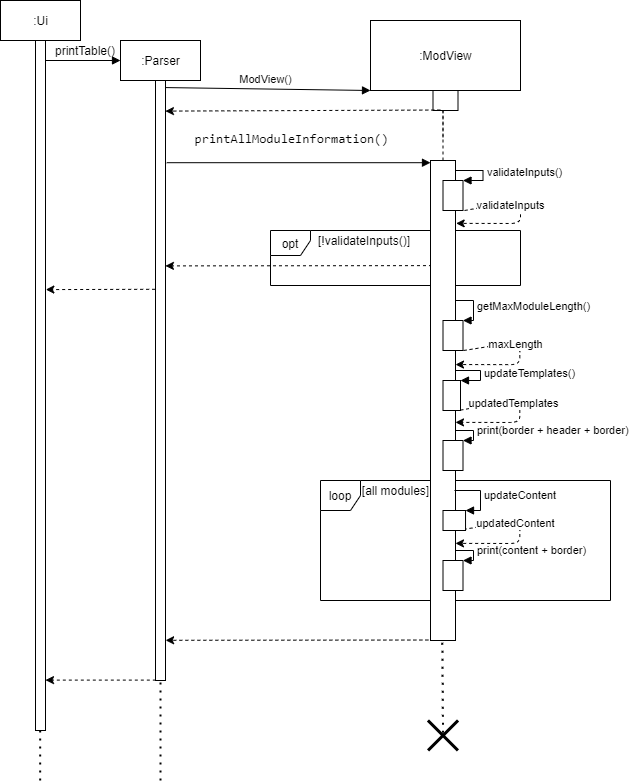
Figure 9. Sequence Diagram of View Module feature
4.7 Breakdown and Analysis
Current Implementation
The analysis command allows the user to view the breakdown of the total time spent in the week across all modules and provides a simple analysis of how they are doing.
-
User calls the view module command from the
Parser.Parserthen calls theprintBreakdownAnalysis()method inUi.printBreakdownAnalysis()then instantiatesViewTimeBreakdownAnalysisclass. and calls theprintTimeBreakdownAndAnalysis()method. -
The user input is subjected to
validateInputs()to verify that both of the following conditions are satisfied.weekNumberis an integer between 1 and 13 inclusive.modlistinlistis not empty.
If any of the above conditions is not satisfied, an error message will be printed and
printTimeBreakdownAndAnalysis()terminates. -
printTime()method inprintTimeBreakdownAndAnalysis()is first called. For eachModuleinmodList,printTime()printsactualWorkloadandexpectedWorkloadin form of a horizontal bar graph. The existence of the desired data is checked usingdoesActualTimeExist()anddoesExpectedTimeExist()methods of theModuleclass. If the desired data does not exist, aNO INPUTwill be printed. -
printBreakdown()then calculates the total time spent by the user on the modules taken in the specified week. It then prints outactualTimeof eachModuleas a percentage oftotalTimeSpent. If there is no input, aNO INPUTmessage will be printed.printBreakdown()return TRUE if there exists aModulethat has a valid input, else False is returned. -
If output of
printBreakdown()isTrue,printAnalysis()will be called.computeAnalysisOfTimeSpent()is called to determine the outcome of the analysis. A message will be printed depending on the output of the analysis.
The following sequence diagram shows how the analysis command works.
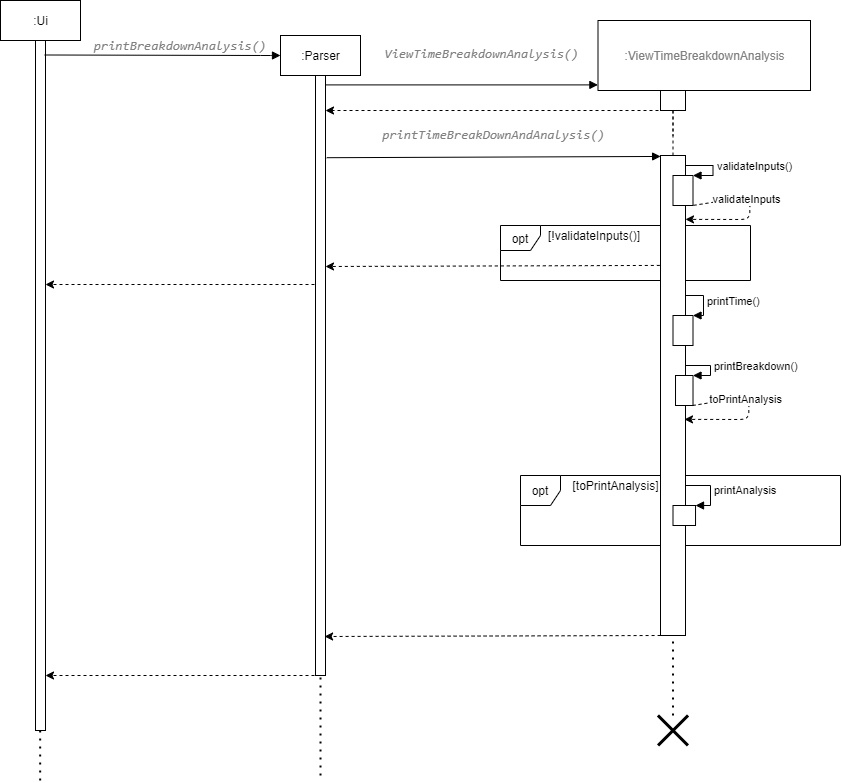
Figure 10. Sequence Diagram of Analysis feature
Design Considerations
- Alternative 1 (current choice): Printing data as a bar graph
- Pros: Easy implementation as the bar graph is printed as a
String. - Cons: It might be difficult to compare across modules using a bar graph.
- Pros: Easy implementation as the bar graph is printed as a
- Alternative 2: Printing data as a line graph
- Pros: Easier to compare across different modules.
- Cons: Difficult to implement as it requires external libraries.
- Cons: Difficult to test due to additional dependencies on external libraries.
4.8 Add Task
The add task feature allows user to add a task under an existing module.
Current Implementation
The addtask command is executed by the parse method in the Parser class, which then calls the addTask method
in the TaskList class. The addTask method performs all the necessary logic for the add task feature.
Given below is an example usage scenario.
- The user input the
addtaskcommand and theparsemethod inParserparses the command. parsecalls theaddTaskmethod inTaskList.- The
addTaskmethod splits the user input into 3 sections:Section 1: commandSection 2: module codeSection 3: task description
- The
addTaskmethod calls thecheckIfModuleValidmethod inModuleListclass to check ifSection 2is a valid module code.- If module code is not valid, the
addTaskmethod will return andUiwill prompt the user to enter a valid module code. - Else if module code is valid, the
addTaskmethod will execute the next step.
- If module code is not valid, the
- The
addTaskmethod calls thecheckIfModuleExistmethod to check ifSecion 2(module code) exists in the database.- If module code does not exist in the database, the
addTaskmethod will return andUiwill prompt the user to execute theaddmodoraddexpcommand first. - Else if module code exists, the
addTaskmethod will execute the next step.
- If module code does not exist in the database, the
- The
addTaskmethod will create a newTaskobject by the constructor inTaskclass, withSection 3(task description). - The
addTaskmethod adds theTaskobject to the array listtasks.
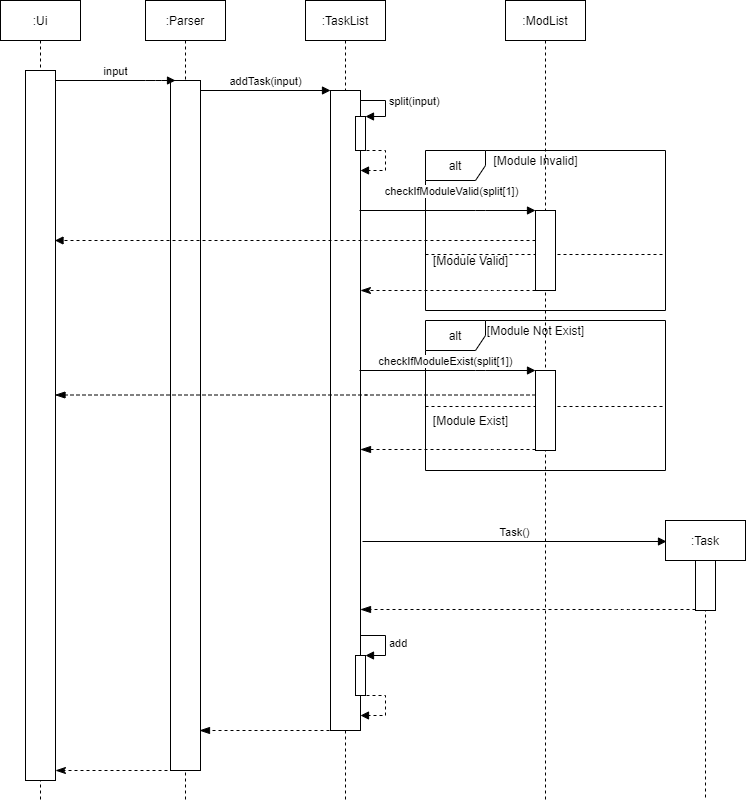
Figure 11. Sequence Diagram of Add Task feature
Design Considerations
-
Alternative 1 (current choice): If module does not exist in module list, do not add the task.
- Pros: Able to let users know that the module does not exist in the module list, hence preventing the situation where users type in a module code wrongly and the task is added under that wrong module.
- Cons: May be slightly inconvenient as user will need to add a module first before adding the tasks related to that module.
-
Alternative 2: If module does not exist in the module list, automatically add the module, then add the task.
- Pros: Slightly more convenient as user can add a new module and task at the same time.
- Cons: May cause confusion and inconvenience if users type in a module code wrongly, and the module is automatically added to the module list.
Future Implementation
A future implementation requires user to enter the expected time required to complete the task, and the week number. The addTask method will split the
user input into 5 sections, with Section 4 as the expected time required to complete the task and Section 5 as the week number. Section 4
and Section 5 will then be used in the future implementation of mark task as done feature, as further illustrated in the mark task as done
section.
4.9 Mark Task as Done
The mark task as done feature allows user to mark an existing task as done.
Current Implementation
The done command is executed by the parse method in the Parser class, which then calls the setDone method in the
TaskList class. The setDone method performs all the necessary logic for the mark task as done feature.
Given below is an example usage scenario.
- The user input the
donecommand and theparsemethod inParserparses the command. parsecalls thesetDonemethod inTaskList.- The
setDonemethod splits the user input into 2 sections:Section 1: commandSection 2: task number corresponding to the index ofTaskobject in array listtasks
- The
setDonemethod will check if the array listtasksis empty.- If array list is empty,
Uiwill notify the user that there is noTaskto mark as done. - Else if array list is not empty,
setDonemethod will execute the next step.
- If array list is empty,
- The
setDonemethod will check the validity ofSection 2(task number).- If task number is not an integer, an exception will be thrown and the
setDonemethod terminates. - If task number is out of bounds,
Uiwill prompt the user to enter a valid task number. - Else if task number is valid,
setDonemethod will execute the next step.
- If task number is not an integer, an exception will be thrown and the
- The
setDonemethod will then call thesetAsDonemethod inTaskclass to mark theTaskcorresponding toSection 2(task number) as done.
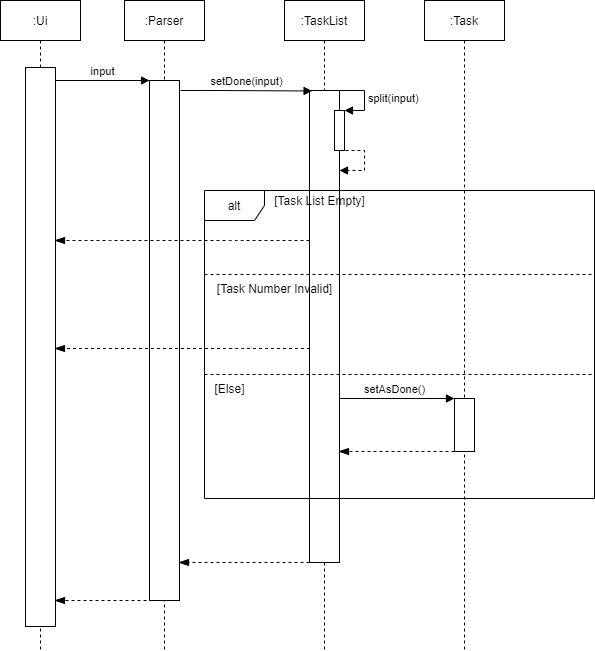
Figure 12. Sequence Diagram of Complete Task feature
Design Considerations
-
Alternative 1 (current choice): Use
Xand/as cross and tick to indicate whether a task is marked as done.- Pros: Easy to implement and works in all systems without the need for special configurations.
- Cons: Does not look as nice.
-
Alternative 2: Use actual unicode symbols as cross and tick to indicate whether a task is marked as done.
- Pros: Looks nicer.
- Cons: Harder to implement and may not work in all systems.
Future Implementation
- When the
Taskis set as done, thesetDonemethod will call theaddTimemethod inModuleListclass to add the expected time required to complete the task to the actual time spent on the module.- This future implementation requires
Section 4(expected time required to complete the task) andSection 5(week number) from the future implementation of theaddTaskmethod to be passed as a parameter to thesetDonemethod and then to theaddTimemethod.
- This future implementation requires
5. Documentation, Logging, Testing, Dev-Ops
6. Appendix: Requirements
6.1 Product Scope
Target User Profile
NUS students
- spend too much time on certain modules and neglecting other modules
- want a timetable to view and breakdown all the module workload easily
- need help to manage the time spent on each module
Value Proposition
- helps to track the time spent on every module
- better prioritize their work for each module
- relieves the stress of NUS students by achieving a work-life balance
6.2 User Stories
| Version | As a ... | I want to ... | So that I can ... |
|---|---|---|---|
| v1.0 | new user | see usage instructions | refer to them when I forget how to use the application |
| v1.0 | student | input my modules | keep track of modules that I am taking |
| v1.0 | student | input the expected module workload | keep track of the recommended time I should spend on the module |
| v1.0 | busy student | view breakdown of my time spent on each module | pinpoint in detail where i spend most of time on |
| v1.0 | student | input the actual time spent on each module | keep track of the actual time I spent |
| v1.0 | careless user | edit the data easily | correct any mistakes I inputted wrongly |
| v1.0 | user | save my data permanently | save the trouble of re-entering my data everytime I start the app |
| v2.0 | user of ModTracker | add tasks related to a module | know what are the outstanding tasks for each module |
| v2.0 | user | save tasks related to a module | be reminded of what tasks I have to do |
| v2.0 | user | save my username | I don't have to re-enter it every time |
| v2.0 | user | manage the task list | use the app as a planner |
| v2.0 | busy user | receive notifications | know immediately which modules I am spending too little or too much time on |
6.3 Use Cases
For all use cases below, the System is the ModTracker and the Actor is the User, unless specified otherwise.
Use case: UC1 - Add module
MSS:
- User requests to add a module
- System prompts user to enter a module code
- User enters a module code
- System adds module to the database
Use case ends
Extensions:
- 3a. Module code is invalid
- 3a1. System shows an error message
Use case ends
- 3a1. System shows an error message
- 3b. Module code already exists in database
- 3b1. System shows an error message
Use case ends
- 3b1. System shows an error message
Use case: UC2 - View analysis of time spent
MSS:
- User requests to view analysis of time spent
- System prompts user to enter a week number
- User enters a week number
- System displays analysis of time spent to user
Use case ends
Extensions:
- 3a. Week number is invalid
- 3a1. System shows an error message
Use case ends
- 3a1. System shows an error message
- 3b. Module list is empty
- 3b1. System shows an error message
Use case ends
- 3b1. System shows an error message
- 4a. No time is spent in the specified week
- 4a1. System shows only time spent and no analysis
Use case ends
- 4a1. System shows only time spent and no analysis
Use case: UC3 - Open notifications
MSS:
- User requests to open notifications
- System displays notifications
Use case ends
Extensions:
- 2a. No notifications
- 2a1. System displays an encouraging message
Use case ends
- 2a1. System displays an encouraging message
6.4 Non-Functional Requirements
- Should work on any mainstream OS as long as they have Java 11 or above installed.
- The commands should be short and succinct such that a user with average typing speed should be able to accomplish the tasks faster than using a regular GUI app.
6.5 Glossary
- mainstream OS - Windows, Linux, macOS
- GUI app - An app that utilises GUI (graphical user interface). It allows users to interact with electronic devices through graphical icons and audio indicator. Most apps like the mobile apps that we are familiar with utilises the GUI.
7. Appendix: Instructions for Manual Testing
Given below are the instructions to test the app manually.
Initial Launch
- Initial launch
- Download the jar file and copy into an empty folder
- Double-click the jar file
Expected: A folder calleddatawill be created and in the folder there will be a file namedmodtracker.txt.
Functions
-
Add module function
addmod- Prerequisites: List all modules using
listcommand. Empty list. - Test case:
addmod CS1231
Expected: CS1231 will be added to the module list. - Test case:
addmod CS1231
Expected: Error message will be shown. CS1231 will not be added as as it is already in the module list. - Test case:
addmod CS111
Expected: Error message will be shown. CS111 will not be added as it falls of the minimum module length. - Test case:
addmod CS1111111
Expected: Error message will be shown. CS1111111 will not be added as it exceeds the minimum module length. - Test case:
addmod
Expected: Error message will be shown. User will be prompted to enter a module code.
- Prerequisites: List all modules using
-
Add expected module workload function:
addexp- Prerequisites: List all modules using
listcommand. List contains only one moduleCS1231with an expected workload of 5 hours. - Test case:
addexp CS2113T 3
Expected:CS2113Twill be added to the module list and has an expected workload of 3 hours. - Test case:
addexp CS1231 8
Expected: Expected workload ofCS1231will be changed to 8 H instead of 5 H. - Test case:
addexp CS1231 -6
Expected: Error message will be shown. Expected workload should not be negative. - Test case:
addexp CS1231
Expected: Error message will be shown. User will be prompted to enter an expected workload. - Test case:
addexp
Expected: Error message will be shown. User will be prompted to enter a module code and an expected workload.
- Prerequisites: List all modules using
-
Add actual time spent function
addtime- Prerequisites: List all modules using
listcommand. List contains only one moduleCS1231. - Test case:
addtime CS1231 2 4
Expected: 2 H will be added to CS1231 in week 4. - Test case:
addtime CS1010 2 4
Expected: Error message will be shown. User will be prompted that the specified module not exist in the module list. - Test case:
addtime CS1231 2
Expected: Error message will be shown. User will be prompted to enter a week number. - Other incorrect addtime commands to try
addtime CS1231,addtime CS1231 2 s tetc. Expected: Similar to previous. - Test case:
addtime CS1231 2 14
Expected: Error message will be shown. User will be prompted to enter a valid week number between 1 and 13 inclusive. - Other incorrect addtime commands to try
addtime CS1231 3 Xwhere X <=0 or X>= 14.
Expected: Similar to previous.
- Prerequisites: List all modules using
-
Minus from actual time spent function:
minus- Prerequisites: List all modules using
listcommand. List contains only one moduleCS1231.CS1231has no input for actual time for all the weeks. - Test case:
minus CS1231 2 4
Expected: 2 H will be subtracted from CS1231 in week 4. - Test case:
minus CS1010 2 4
Expected: Error message will be shown. User will be prompted that the specified module not exist in the module list. - Test case:
minus CS1231 2
Expected: Error message will be shown. User will be prompted to enter a week number. - Other incorrect addtime commands to try
minus CS1231,minus CS1231 2 s tetc.
Expected: Similar to previous. - Test case:
minus CS1231 2 14Expected: Error message will be shown. User will be prompted to enter a valid week number between 1 and 13 inclusive. - Other incorrect addtime commands to try
addtime CS1231 3 Xwhere X <= 0 or X >= 14.
Expected: Similar to previous. - Test case:
minus CS1231 8 7
Expected: User will be prompted that there is not input for the specified week so time cannot be subtracted from that week.
- Prerequisites: List all modules using
-
Analyse actual time spent function:
analyse- Prerequisite: List all modules using
listcommand. List contains at least one module. - Test case:
analyse 3
Expected: Analysis of time spent on the modules in the specified week will be displayed. - Test case:
analyse 0
Expected: Error message will be shown. User will be prompted to enter a valid week number between 1 and 13 inclusive. - Other incorrect analysis commands
analyse 0,analyse xwhere X <= 0 or X >= 14.
Expected: Similar to previous. - Prerequisite: List all modules using
listcommand. List is empty. - Test case:
analyse xfor all numeric values of x
Expected: Error message will be shown. User will be prompted that module list is empty.
- Prerequisite: List all modules using
-
Delete module function:
deletemod- Prerequisites: List all modules using
listcommand. List contains a moduleCS1231. - Test case:
deletemod CS1010
Expected: Error message will be shown. User will be prompted thatCS1010is not does not exist in the database. - Test case:
deletemod CS1231
Expected:CS1231and all related tasks would be removed from the database. - Test case:
deletemod C1213
Expected: Error message will be shown. User will be prompted to enter a valid module code. - Other incorrect delete module commands to try
deletemod C1,deletemod CS12345678or any other invalid module codes.
Expected: Similar to previous.
- Prerequisites: List all modules using
-
Delete expected module workload function:
deleteexp- Prerequisites: List all modules using
listcommand. List contains a moduleCS1231. - Test case:
deletexp CS1010
Expected: Error message will be shown. User will be prompted thatCS1010does not exist in the database. - Test case:
delete CS1231
Expected:Expected workloadofCS1231will be removed from the database. - Test case:
deleteexp C1213
Expected: Error message will be shown. User will be prompted to enter a valid module code. - Other incorrect delete module commands to try
deleteexp C1,deleteexp CS12345678or any other invalid module codes.
Expected: Similar to previous.
- Prerequisites: List all modules using
-
Delete actual time spent function:
deletetime- Prerequisites: List all modules using
listcommand. List contains a moduleCS1231.CS1231has valid actual time spent for week 1 to 13. - Test case:
deletetime CS1231 7
Expected: Actual time spent on CS1231 in week 7 will be deleted. - Test case:
deletetime
Expected Error message will be shown. User will be prompted to enter a valid module code and week number. - Test case:
deletetime CS1231
Expected: Error message will be shown. User will be prompted to enter a valid week number.
- Prerequisites: List all modules using
-
Add tasks function:
addtask- Prerequisites: List all modules using
listcommand. List contains a moduleCS1231. - Test case:
addtask CS1010
Expected: Error message will be shown. User will be prompted thatCS1010does not exist. - Test case:
addtask
Expected: Error message will be shown. User will be prompted to enter a valid module code and week number. - Test case:
addtask CS1231
Expected: Error message will be shown. User will be prompted to enter a task description. - Test case:
addtask CS1231 do homework
Expected:do homeworktask will be added to the tasklist of CS1231.
- Prerequisites: List all modules using
-
Mark task as done function:
done- Prerequisites: List all modules using
listcommand. List contains a moduleCS1231.CS1231has 2 tasks attached to it,do homeworkandrevise for exam. - Test case:
done 1
Expected: Task number 1,do homeworkwill be marked as done. - Test case:
done 8
Expected: Error message will be shown. User will be prompted to enter a task number between 1 and total number of tasks (2 in this case). - Other incorrect done commands to try
done 0done xwhere x<0 or x> total number of task
Expected: Similar to previous.
- Prerequisites: List all modules using
-
Delete task function:
deletetask- Prerequisites: List all modules using
listcommand. List contains a moduleCS1231.CS1231has 2 tasks attached to it,do homeworkandrevise for exam. - Test case:
deletetask 1
Expected: Task number 1,do homeworkwill be deleted. - Test case:
deletetask 8
Expected: Error message will be shown. User will be prompted to enter a task number between 1 and total number of tasks (1 in this case). - Other incorrect done commands to try
deletetask 0deletetask xwhere x<0 or x> total number of task
Expected: Similar to previous.
- Prerequisites: List all modules using